Color Therapy Tool
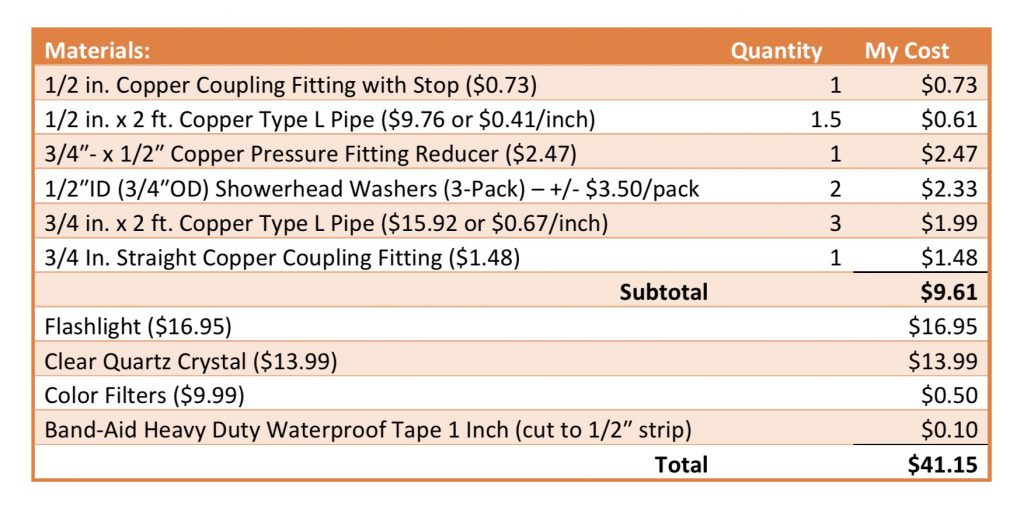
Materials:
- 1/2 in. Copper Pressure Cup x Cup Coupling Fitting with Stop ($0.73)
- 3/4 IN. STRAIGHT COPPER COUPLING FITTING ($1.48)
- 3/4″- x 1/2″ Copper Pressure Fitting Reducer ($2.47)
- Flashlight ($16.95)
- Clear Quartz Crystal ($13.99)
- 3/4 in. x 2 ft. Copper Type L Pipe ($15.92 or $0.67/inch)
- 1/2 in. x 2 ft. Copper Type L Pipe ($9.76 or $0.41/inch)
- 12 x 12 Inches Lighting Gel Filter – 10 Pcs Transparent Color Filters ($9.99)
- 1/2″ID (3/4″OD) Showerhead Washers (3-Pack) – +/- $3.50/pack
- Band-Aid Heavy Duty Waterproof Tape 1 Inch (cut to 1/2″ strip)

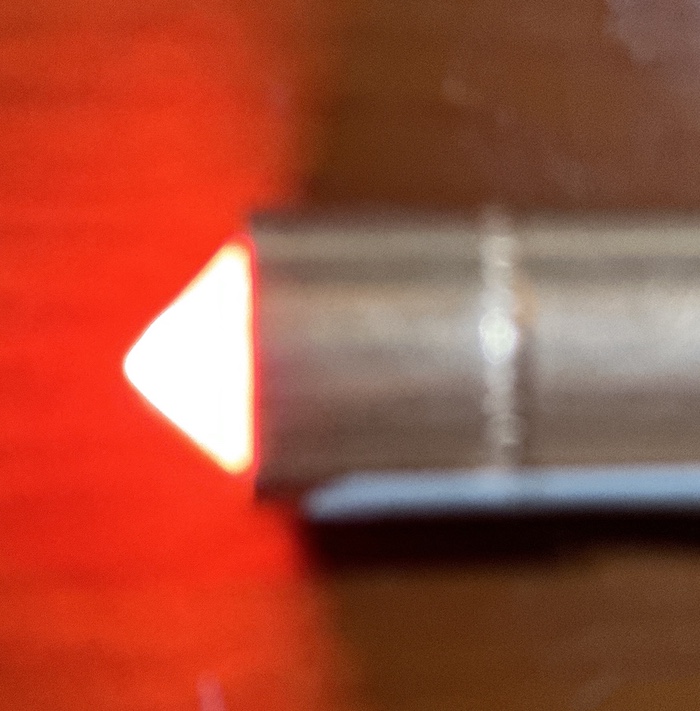
- Prepare filter – Cut the filter and place it on the washer (I used gorilla glue)
- Wrap the crystal with the bandage tape (to cushion it and make it wide enough to fit into the 1/2″ copper pipe securely.
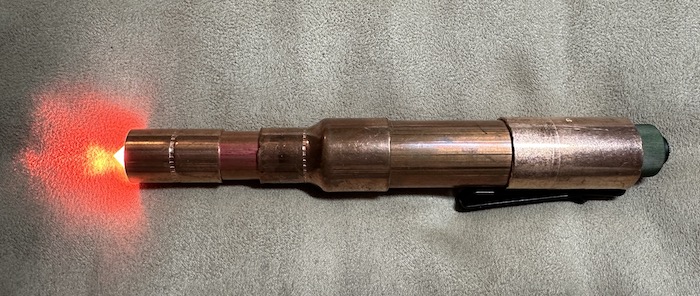
- assemble the tool components in the following order:
- 3/4 in. Copper Coupling Fitting with Stop
- 3/4″ copper pipe (the minimum length should be as long as the flashlight)
- Insert color filter washer into the 3/4″ x 1/2″ reducer before attaching the reducer to the 3/4″ copper pipe
- Insert small piece of 1/2″ copper pipe into the reducer (mine measured 2″)
- Insert the 1/2 in. Copper Coupling Fitting with Stop that contains the quartz crystal at the tip.
Notes:
• Design starts with a choice of flashlight. I chose a 550 High Lumens rechargeable mini flashlight. The clip is important.
• The size of the flashlight will dictate the length/diameter of the copper needed. This design can easily be modified due to preference.
• The flashlight and crystal were the high end in cost. I tried to use two of the crystals that I already have but had trouble with them being too big or not clear enough to my liking.
• To wrap or not to wrap? I have not yet decided if I want to wrap the tool with leather or wear gloves when I use the tool.
• I have not glued any of the pieces together yet, as I have yet to decide if I’m going to glue the color filters into the reducer and have a separate reducer per color. I bought Gorilla Glue, just in case.
• I also found that the heat of the flashlight might warp the filter, so I added some distance between the flashlight and the actual filter and I also placed the filter between two washers.(work in progress).
• Each color filter sheet is 12″ x 12″ and I only needed a 3/4″ circle for each filter. They’re easy to cut with scissors. It just takes time. I guessed at the cost for the single unit.
• At this point, it’s still a functional work in progress.
• Please come back to see the final product.